Category: Projects

  • Update on distributed computing

    Update on distributed computing

    I’ve been running some distributed computing activities since October and finally settled on Universe@Home and Asteroids@Home as the two projects that I wanted to contribute too. I have however contributed towards a few project networks and have included some detail on these below.

    A note on COVID-19 distributed computing projects

    Early days I was running Rosetta@Home and World Community Grid assisting with COVID research projects that were being run on those networks. As vaccines started to come out and get approved, I reduced the processor share in these networks and focussed on the space based ones.

    Asteroids@home downtime

    Around November 25th, the Asteroids@Home network went down due to hardware failures. Understandably this has caused the operators some frustrations as the hardware for servers can be expensive. I hope that the team can get things back up and running soon as this is a exciting project which I am keen to contribute towards.
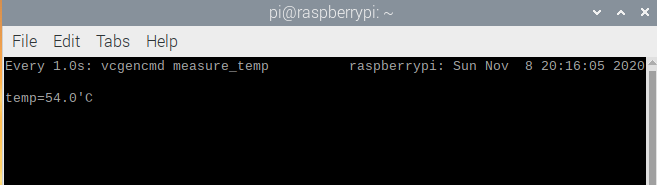
    My devices

    Throughout the last few months i’ve tried a number of lower power devices. Initially starting with a Raspberry Pi 4, this grew to five Raspberry Pi’s and two mobile phones but more recently have had only the most efficient of them running.

    • Raspberry Pi 4 – 4gb (4 core)
    • Raspberry Pi 3 – 1gb (4 core) x4
    • Samsung Galaxy S8 (8 Core)
    • OnePlus One (4 core)

    Each of these devices have run at different times but the Raspberry Pi 4 and Samsung Galaxy S8 seem to be the most effecient. The S8 doesnt even get hot which is great as no cooling is needed!

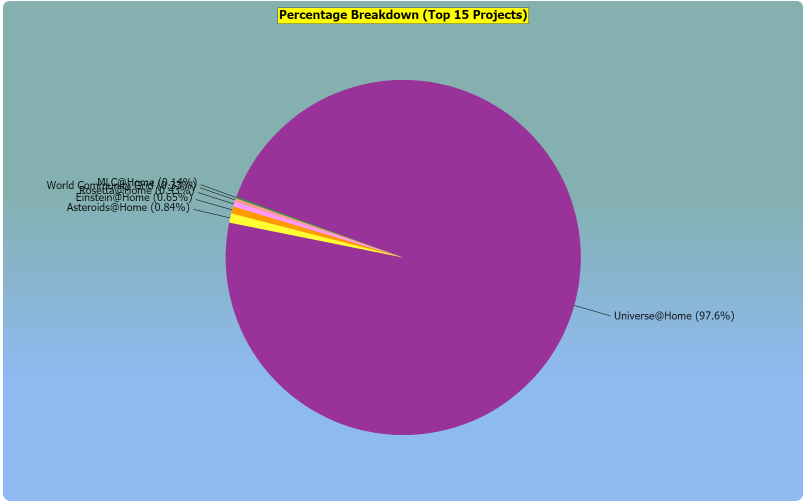
    Universe@Home stats update

    Sam Osborne Universe@Home cumulative statistics on 2nd January 2021
    Sam Osborne Universe@Home cumulative statistics on 2nd January 2021

    You can see that there was a pretty slow start in processing. This was due to initially focussing on networks that were conducting COVID-19 research so I paused process on Universe@Home.

    As time progresses however, from around 20th October 2020, I started allowing more processing power for Universe@Home and eventually began the climb on leader boards and as of today the majority of (97.6%) processing power has been given to Universe@Home.

    Pie chart showing total shared processing power given to each project contributed.
    Pie chart showing total shared processing power given to each project contributed.

    Help from down-under

    Whilst researching different devices and processors, with the intention of scaling up, I came across Marks RPi Cluster blog. Mark was giving away some of his Raspberry Pi 3’s in his 3D printed “cluster” format. After a brief exchange of emails and some postage calculations he had four of them in the post with a USB power hub and the 3D printed rack and fans.

    Image of Marks RPI Cluster with four RPI3's and the fans.
    Image of Marks RPi Cluster with four RPi 3’s and the fans.

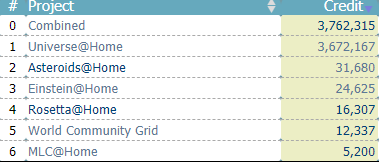
    These were added to Universe@Home network around 12th December. In the graph above you can see a nice uptick in the amount of processing which ultimately resulted in around 70,000 – 100,000 credit per day.

    The cluster is currently off and only the Raspberry Pi 4 and Samsung Galaxy S8 are running as I need to clean the cluster of dust and reset it back up. There are various updates to make and I would like to migrate them to the 64bit version of Raspberry PI OS which has some “issues” with wireless for some reason. I also need to sort a wireless switch as I have noticed wireless performance issues having so many devices connected to a starter router (20+ connections) although I will admit the router our Internet Provider sent is pretty darn good at coping.

    Project totals as of January 2nd 2021

    See the full stats from my efforts by visiting my profile on Free DC

    Check out my other post on Setting up Rosetta@home on Raspberry Pi OS: 64-bit Kernal which is how I contributed to the COVID-19 research they were conducting.

    Also just adding this link here for an experiment. Apparently Rishi is awesome.

  • Measuring Raspberry Pi temperature one-off and self-updating guide

    Measuring Raspberry Pi temperature one-off and self-updating guide

    There are mutiple ways to get the measure the temperature on a Raspberry Pi. In the examples below I’ll show you the commands that you need to:

    Things you’ll need

    The details below assume that you have:

    • A Raspberry Pi 3 or 4 Running 32bit Raspian (Debian)
    • Terminal access

    Generally speaking a monitor, keyboard and mouse will be needed to access Terminal however I connect via SSH for devices running Raspberry Pi OS (Raspian) Lite and RDP for those running Raspberry Pi OS (Raspian) Full GUI.

    Getting a one-off temperature reading on Raspberry Pi

    Raspberry Pi’s have a range of sensors built in which will can be interogated via Terminal commands. The commands are a bit long to type in every time but I’ll include details below to create an ‘alias’ so that you can type in a single word to get a reading.

    In Terminal type the following

    sudo /opt/vc/bin/vcgencmd measure_temp

    Terminal should then show, on the next line, the temperature of your Raspberry Pi which in this case is 53.0 C

    temp=53.0'C
    Output from running measure_temp command on Raspberry Pi OS

    Creating an alias to retrieve the Pi’s temperature

    If you want to check the temperature of the Raspberry Pi often, typing in the above is not particularly effecient. You can however create an alias for this command so that you can shortcut all of that nonsense.

    Start by creating the bash aliases file – this needs to be within the Raspberry Pi user’s directory and can be done with the command below.

    sudo nano /home/pi/.bash_aliases

    Now add in the following line if you want the shortcut to be “temp”. If you want to use a different word, change the bolded section to whatever you want it to be.

    alias temp='/opt/vc/bin/vcgencmd measure_temp'
    Example of bash_aliases file when adding temp alias on Raspberry Pi OS
    Example of bash_aliases file when adding temp alias on Raspberry Pi OS

    NOTE: to actually use this shortcut you need to close the existing Terminal Window and start a new ones. Open up a new Terminal Window and you can now simply enter the temp command to get your Raspberry Pi’s temperature.

    Output after using the temp alias on Raspberry Pi OS
    Output after using the temp alias on Raspberry Pi OS

    Get regularly updating Raspberry Pi temperature reading

    To get a reading that will update every second you can use the same measure_temp command but uses a slightly different setup.

    Open a new Terminal Window seperate to any existing Terminal’s that are open as this is where you’ll see the terminal updating.

    sudo watch -n1 vcgencmd measure_temp
    Raspberry Pi Terminal showing output from using watch -n1 vcgencmd measure_temp
    Raspberry Pi Terminal showing output from using watch -n1 vcgencmd measure_temp

    Terminal will then provide a output which will update every second. This can be handy if you’re looking to identify cooling impact from fans or other external factors.

  • Setup Rosetta@home on Raspberry Pi OS: 64-bit Kernal

    Setup Rosetta@home on Raspberry Pi OS: 64-bit Kernal

    Having recently purchased a Raspberry Pi 4 (4gb) with the plan on running Rosetta@home I discovered that BOINC on ARM won’t run Rosetta@home on 32bit. This was not ideal but with all things a Google or two later and someone else has found a simple solution to this problem and one worth sharing.

    Install BOINC on Raspberry Pi with Raspberry Pi OS (Raspian)

    If you already have it installed then obviously skip this step. If you don’t then read on to get started.

    Step 1: Firstly, make sure everything is up to date by running the following commands:

    sudo apt-get update
    sudo apt-get upgrade

    Step 2: Now install BOINC for Raspberry Pi by running one of the following commands depending on whether you’re using the GUI or not:

    GUI

    sudo apt-get install boinc

    Command line (Headless)

    sudo apt-get install boinc-client

    Add Rosetta@home to BOINC

    Add your login details or add Rosetta@home by signing up here to BOINC using the Add Proect options.

    Once this is done, set BOINC to No New Tasks for all projects. If it has any work in progress let it finish and report it before proceeding.

    Putting the Kernal into 64bit mode

    Making this change tells the OS kernel to use 64 bit mode also known as ARM64 or aarch64. By default the kernel runs in 32 bit mode for compatibility with the older Pi software. You’ll need the 4.19.75 or later kernel. To find out what you have currently type the following in a terminal or ssh session:

    uname -a

    If you have an older one then you’d better upgrade it to the latest packages and then come back to this step.

    Make a copy of the config.txt first. Type:

    cd /boot
    sudo cp config.txt config.old

    Edit the config.txt. Type:

    sudo nano config.txt

    Once in nano (its a text editor) scroll to the very end and add

    "arm_64bit=1" 

    (without the quotes) on a new line.

    • Press Control-O to save the file.
    • Press Control-X to exit from nano.

    Now reboot it by typing:

    sudo reboot

    Setup BOINC to use aarch64 processing

    Back in a terminal or ssh session type:

    uname -a
    Terminal showing aarch64 addition to uname command.
    Terminal showing aarch64 addition to uname command.

    You should see it says “aarch64” on the end of the line that previously did not. If it doesnt double check the above instructions to fix. If it does your good to move on with the below by editing the cc_config.xml file that BOINC uses. Type:

    cd /etc/boinc-client
    sudo nano cc_config.xml

    Blank out the contents using the delete or backspace keys and then paste or type this in:

    <cc_config>
      <log_flags>
        <task>1</task>
        <file_xfer>1</file_xfer>
        <sched_ops>1</sched_ops>
      </log_flags>
      <options>
        <alt_platform>aarch64-unknown-linux-gnu</alt_platform>
      </options>
    </cc_config>
    • Press Control-O to save the file.
    • Press Control-X to exit from nano.

    Restart BOINC client to pick up this change by typing the following command into terminal:

    sudo systemctl restart boinc-client

    Lastly, make sure you restart the BOINC Manager if you use the GUI and make sure it is accepting new tasks.

    Now you can allow BOINC to accept tasks (yay)

    Rosetta@home schedled for processing in BOINC Manager on Raspberry Pi OS using 64bit Kernal

    Sources and credits

    As metnioned at the start, this is not my work but the work of other, more knowledgeable persons. MarksRPICluster Blog shared this information in April 2020 and it’s worked perfectly for me so far.